How to use the CRON function on the OVH shared servers
Tutos - 14/07/2015
CRON on the new interface of the OVH shared servers.
0. What is the CRON function?
To be sure that we are talking about the same thing, I'm going to reintroduce the
CRON. This function allows you to schedule tasks on a server (or PC of course). Indeed, as the name suggests it, chrono tab (for cron) is the table of scheduled tasks. It can perform the tasks in minutes, hours, specific days and at regular intervals. As part of the OVH shared server, it will run PHP script at regular intervals.
1. Prepare the script
Now, before setting a scheduled task on OVH, we will prepare the PHP file. The beginning of your PHP file should look like this:
#!/usr/local/bin/php
<?php

// Code

?>
#!/usr/local/bin/php tells which program should be used to run our script.To be sure, I suggest you change your type of paths
../ ../../, ../../sub_folder/sub_sub_folder in your script by a direct link from the root /home/name_of_the_website/.... This allows for direct paths rather than relative, and therefore do not change depending on where you are.Regarding the content of your script itself, the execution should not exceed 5 minutes. If this is the case, the execution will not go to the end and this can cause you problems. If you exceed 5 minutes, you will have to cut it into several pieces or optimize...
Your PHP script is ready. I advise you to place it in a folder other than the
www. You can access directories that are not accessible by site visitors, so why not use it. This limits access to the document.
2. Add a new schedule
Login to the OVH management interface. Currently, it is in version 3 of the interface.
https://www.ovh.com/manager/web/login/
2.1 Click "Cron"

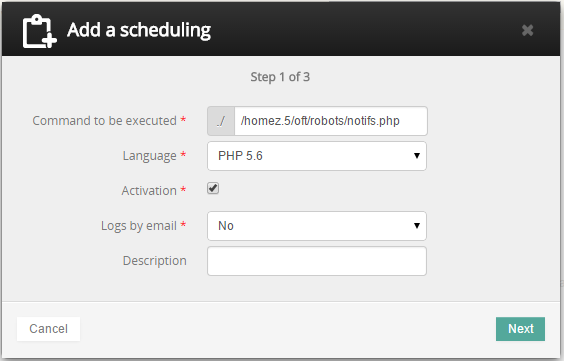
2.2 Click "Add a scheduling"

2.3 Complete the form and click "Next"
Here we must be careful. The path does not begin with
/home/name_of_the_website/..., but /homez.num_ofthe_server/name_of_the_website/.... Even if there is the / shown in the interface, personally I add it and it works perfectly.Concerning the PHP version, you should choose the latest to avoid potential problems. Here it is the 5.6.
Then simply select "Activation" to enable the planning.
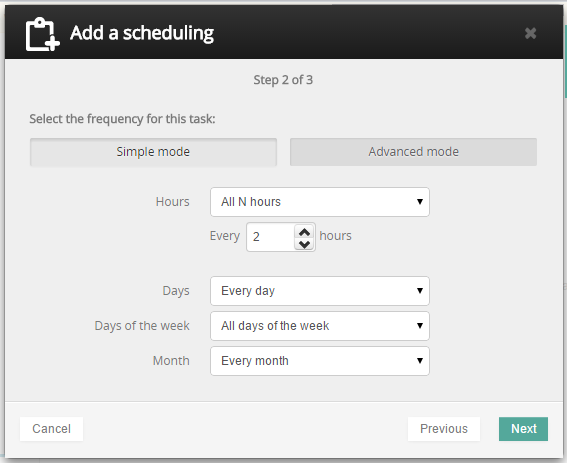
2.4 Complete the form and click "Next"
Here, I prefer to stay on the "simple mode". Because as the name suggests, it is simpler, so why complicate life :). I think the form is simple so I leave you browse it and see which settings suit best your use.
2.5 Finalize clicking "Confirm"
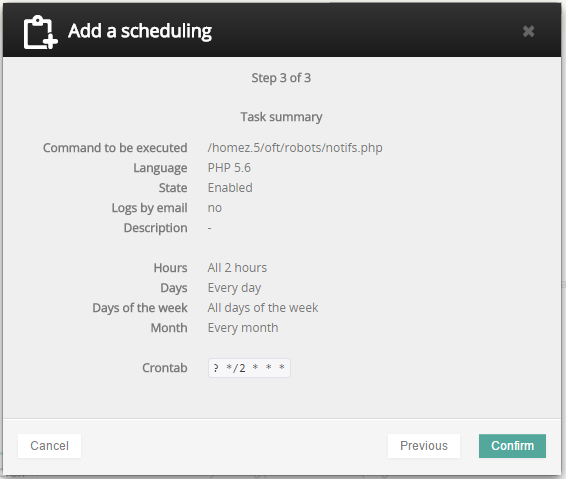
Now you have configured the scheduling of a regular task by using the CRON function on a shared server OVH !

Pierrick CUSSET
Autodidact passionate about the web, I'm always looking for new challenges.
Founder of Online-Free-Tools.com.
Comments
No comment
 FR
FR
 EN
EN